Python Model - Segmentation Algorithm
Segmentation Algorithm Overview
The following example goes over building a Python model for segmentation algorithms. You can find another example of building a Python model for a classifier algorithm in the Classifier Algorithm Documentation. Segmentation algorithms identify the start and end of events based on customizable properties like signal threshold and window size.
Example Code
Download the zip file
Unzip the file and open
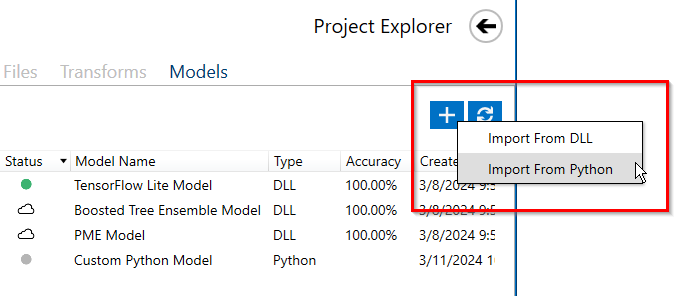
sliding-window.pyto view and edit the source codeImport the Python file through the Data Studio
API Overview
The Data Studio allows you to import Python algorithms as models. Python models must implement two APIs:
get_info_json()
recognize_capture(data, params)
The get_info_json API returns the JSON serialized input contract as a string. The Data Studio UI uses this get_info_json response to dynamically generate a parameters selection screen for the transform.
The recognize_capture API is responsible for taking the input data and parameters from the Data Studio and returning a list of segment label dictionaries which contain the start, end and label name of each segment.
The output should be in the format of a list of dictionaries describing the segments to be added
[
 {'SegmentStart': 0,
 'SegmentEnd': 100,
 'ClassificationName': 'Label Name'},
 {'SegmentStart': 50,
  'SegmentEnd': 150,
  'ClassificationName': 'Label Name'},
]
Several helper functions demonstrate how to take the input from the Data Studio and turn it into simple Python functions, as well as some helper functions for turning Python objects back into the format the Data Studio will understand.
Input Contract
The input contract is a list of dictionaries. Each item in the list describes an input parameter that the user can configure. The properties of the dictionary are
name: The name of the parameter
display_name: The name to display in the UI, defaults to name if not included
type: The Type of the parameter (bool, int, float, string)
default: The default value to use for the parameter
description: Description of the parameter that will show up in the UI
range: A tuple of min and max values used to limit the input parameters min and max value, eg [0,100] would mean only values from 0 to 100 would be acceptable
options(optional): A list of options that can be used to create a dropdown selection
num_columns(Reserved): This option is reserved for the “columns” input parameter. It specifies how many input channels are allowed in this function. -1 or empty means unlimited. A specific number like 1,2,3,4 means that number is required.
get_info_json API
The get_info_json API returns the input contract, along with some other information about the transform. When the transform is loaded, this function is called to populate the database with information about the transform. The get_info_json will return a JSON serialized string. Typically, we call the get_info function which returns a dictionary. The get_info dictionary typically will have
name: Name of the Function (used in the UI as the default)
type: Specifies the type of object this is
subtype: Specifies a subtype, this is used for organizing transforms
description: A description of the function that will be shown in the UI
input_contract: A description of the parameters and inputs including types, bounds and options
output_contract: Used to include information about the output of the function
Here is an example of the get_info API for a Sliding Window Segmentation algorithm Python algorithm that you can import as a model into the Data Studio.
def get_info_json() -> str:
   return json.dumps(get_info())

def get_info() -> dict:
   return {
      "name": "Sliding Window",
      "type": "Python",
      "subtype": "Segmentation",
      "description": "This algorithm will segment data using a sliding window approach",
      "input_contract": [
            {
               "name": "window_size",
               "type": "int",
               "default": 400,
               "range": [200, 1000],
            },
            {
               "name": "delta",
               "type": "int",
               "default": 400,
               "range": [200, 1000],
            },
      ],
      "output_contract": [],
   }
And here is a screenshot of the UI that is generated.
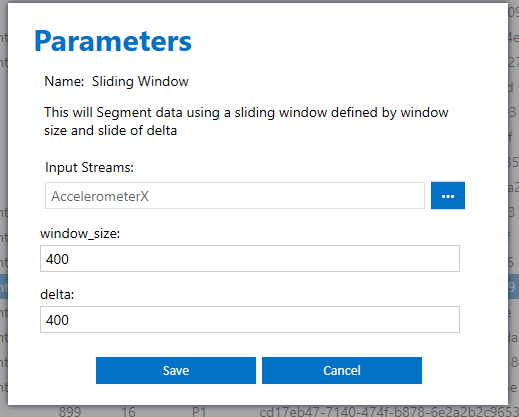
When the user hits save, a model.json file is created inside the imported transforms folder. For this function, here is the model.json file
{
   "input_contract": {
      "window_size": 400,
      "delta": 400,
      "columns": [
            "AccelerometerX"
      ]
   }
}
Whenever the user updates parameters and saves, this model.json file will be updated.
Recognize Capture API
When the Data Studio runs the model is will call the recognize_capture API of the imported Python function to apply to the sensor data. The Data Studio passes two parameters, the data object and the parameters object. The SensiML Python library includes helper functions for converting the objects passed-int from the Data Studio into standard Python objects. Let’s look at an example.
This is the main recognize_capture function for the sliding window algorithm that the Data Studio calls. We use the built-in convert_to_datasegments function call on the data to turn that into a data_segments object. This allows us to cast the objects created in the Data Studio to Python types that are easy to work with. Then we run the built-in validate_params function to validate the input contract and the passed in parameters. After that, we use pass the data_segment and params variables to the segment_data function which does the segmentation. Finally, we return data to the Data Studio passing it through the to_data_studio function which converts data segments into the appropriate datastudio format.
def recognize_capture(data, params):
   data_segments = convert_to_datasegments(data)

   params = validate_params(get_info()['input_contract'], params)

   data_segments = segment_data(data_segments, params['window_size'], params['delta'])

   return to_data_studio(data_segments)
The segment_data function is here. This takes then input data, and creates data segments that have the new sizes defined by the windowing parameters
def segment_data(
   input_data: DataSegments, window_size: int, delta: int
) -> DataSegments:
   new_segments = []
   for segment in input_data:
      for segment_id, start_index in enumerate(
            range(0, segment.data.shape[1] - (window_size - 1), delta)
      ):
            tmp_segment = DataSegment(
               segment_id=segment_id,
               columns=segment.columns,
               capture_sample_sequence_start=start_index,
               capture_sample_sequence_end=start_index + window_size,
            )
            tmp_segment._data = segment.data[
               :, start_index : start_index + window_size
            ]
            new_segments.append(tmp_segment)

   return DataSegments(new_segments)
The to_data_studio function is below, it converts the datasegments into the return object format defined in the API as a list of dictionaries of the format
[
 {'SegmentStart': 0,
 'SegmentEnd': 100,
 'ClassificationName': 'Label Name'},
 {'SegmentStart': 50,
  'SegmentEnd': 150,
  'ClassificationName': 'Label Name'},
]
These segments are then stored in the Data Studio and can be edited or saved.