Wizard Magic Wand Gesture Game
Overview
The SensiML Wizard Wand game provides an example of a complete application built around on-device, ML-based gesture recognition as the central feature of the game. Using the IMU sensor of the M5Stack M5StickC PLUS IoT dev kit, the Wizard Wand Gesture Recognition game challenges users to complete a series of alphabetic gestures before a game clock timer runs out.
The game consists of:
A SensiML gesture recognition library that executes on the embedded device to detect if user gestures match one of six different target gestures
Application logic built in the Arduino IDE that sequentially present users with target gestures, manages the game clock, and controls game UI elements via the device screen, external LEDs, and the audio buzzer/speaker.
A companion PC application (WPF C#.NET application, built in Microsoft Visual Studio) to display the game status in real-time using a Wi-Fi HTTP REST API.
A physical prototype device to integrate an off-the-shelf IoT dev kit from M5Stack into a ‘wizard-wand’ gaming device
With this tutorial and the companion reference firmware documentation for the M5StickC PLUS, we demonstrate the ease with which gesture-based recognition can be added to a variety of embedded IoT applications using SensiML’s memory optimized TinyML code library. Feel free to use this example application as a starting point to develop your own gesture recognition application or to prototype other sensor ML use cases with the M5Stack and ESP32-based dev kit.
To win the game, users must complete in order the following gestures:

Making the game challenging, users must complete the gesture set before the game clock (represented as a red bar at the top of the device screen) runs out.
If the user provides either the wrong gesture or an unrecognized motion, they will be presented with one of these error images on the device screen:

The game ends with either the clock running out or the user having completed all 7 gestures before time ends.

Installing the Game Firmware
The wizard wand game is part of the SensiML reference firmware for the M5Stack M5StickC PLUS ESP32-PICO Mini IoT Dev Kit. To download the firmware and install it to the M5StickC PLUS, see the associated device documentation under the Supported Devices list.
Wizard Wand Game Play
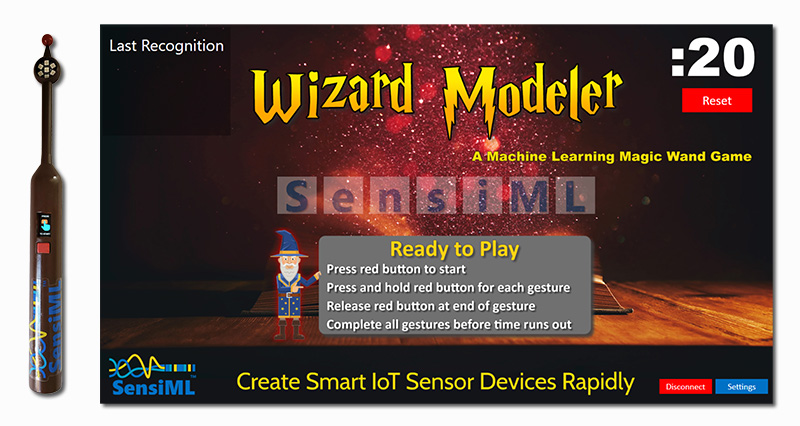
To start the game, ensure the wizard wand (or bare M5StickC PLUS) is showing the following game start screen:

Note
If the device does not show this screen try pressing and holding the front button just below the screen for 2 seconds and releasing. If the start screen still does not show, press the power button on the side of the device for six seconds until the screen blanks and then press the same power button again while holding down the front button to restart the device firmware into the settings menu. Ensure the Program Mode is set to “GAME” in the Settings menu.
Game play starts at the moment the front button just below the screen is pressed and released.
The screen then presents the target gesture “wizard spell” to perform. To perform the gesture press and hold down the front button while moving the device in the motion of the displayed gesture. Release the button as soon as you have completed the gesture.
Tip
The red arrow overlaid on the green gesture path provides a hint on which end of the gesture movement to start.
If you have performed the “wizard spell” gesture correctly, you will be rewarded with a rapid beep tone, a new color lighting up on the wand head LED array (if using the full wand device), and a new gesture shown on the screen to perform.
If the device did not recognize your gesture or concluded you performed the wrong one, the screen will display an error image with a clue to help you.
Across the top of the screen you will see a growing red bar. If the bar reaches the right hand side before you have completed all the target gestures, you have lost the game and should try again to perfect your technique.
With each new correct gesture, the wand device will light another colored LED at the wand head. If you make it all the way through you are rewarded with a flashing color strobe and a “You’re a Winner!” screen.
To restart the game afterwards, press and hold the front button below the screen for 2 seconds and then release to return to the start screen.
Tip
If the game proves to be too hard or too easy, the starting game clock time can be adjusted from the 20 second default time. Press the power button on the side of the device for six seconds until the screen blanks and then press the same power button again while holding down the front button to restart the device firmware into the settings menu. Within the Settings Menu the Game Time value can be adjusted from 0 - 40 secs. The settings for Game Time only appears when the firmware Program Mode is set to GAME.
Wizard Wand Companion PC App
Improving the user experience (and demonstrating how SensiML Knowledge Pack output can be easily conveyed in real-time to PC and cloud applications over Wi-Fi), we also provide a sample Windows companion application for the Wizard Wand game.

Since all game control is done via the wizard wand device (M5StickC PLUS), there are very few settings to describe in the Windows application. The most important is to setup the application to connect to the right IP address of the device. This is done by clicking on the Settings button

When the settings box appears, type in http:\\IP1.IP2.IP3.IP4 replacing IPx with the correct IP address for the Wi-Fi connected address of the wizard wand / M5StickC PLUS device. If your device is not connected to Wi-Fi, see the instructions at Setting Up Wi-Fi Connectivity on the M5StickC PLUS supported platform page.
Once the IP address is correct, press the Connect button to synchronize the PC companion app to the wand device. Now the game status of the wizard wand will be shown in the Windows application as well as on the screen of the M5StickC PLUS itself.
To reset the game timer, the reset button will communicate to the device to reset the game.

The game relies on HTTP request submissions sent from the PC application to the device to receive status updates on the game progression. By pressing CTRL+D or checking the debug mode checkbox in the Settings window, you can monitor the log entries of the HTTP request/response.
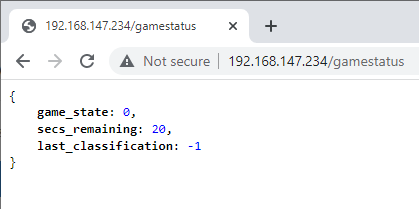
The response is a JSON formatted string with game state, time remaining in the game, and the last recognized classification.
Game State |
Description |
|---|---|
0 |
Ready to Play |
1 |
Awaiting target gesture “S” |
2 |
Awaiting target gesture “e” |
3 |
Awaiting target gesture “N” |
4 |
Awaiting 2nd target gesture “S” |
5 |
Awaiting target gesture “I” |
6 |
Awaiting target gesture “M” |
7 |
Awaiting target gesture “L” |
8 |
Game has been won |
9 |
Game has been lost |
Example Wizard Wand Dataset
We provide the example dataset we used to construct this demo below so you can view and modify the project on your own.
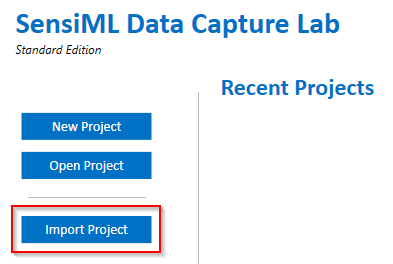
Download and unzip the project file.
Import the project using the Data Studio.
In the screenshot below of one of the full gesture set raw data files, you will note that the sensors include 3 axes of accelerometer, 3 axes of gyroscope, and a trigger channel. The accel/gyro data is recorded from the M5StickC PLUS MPU6886 IMU sensor. The trigger channel represents a pre-processed segment trigger that is controlled by the front button just below the screen on the M5StickC PLUS (the same button used in game play to start/stop the gesture).
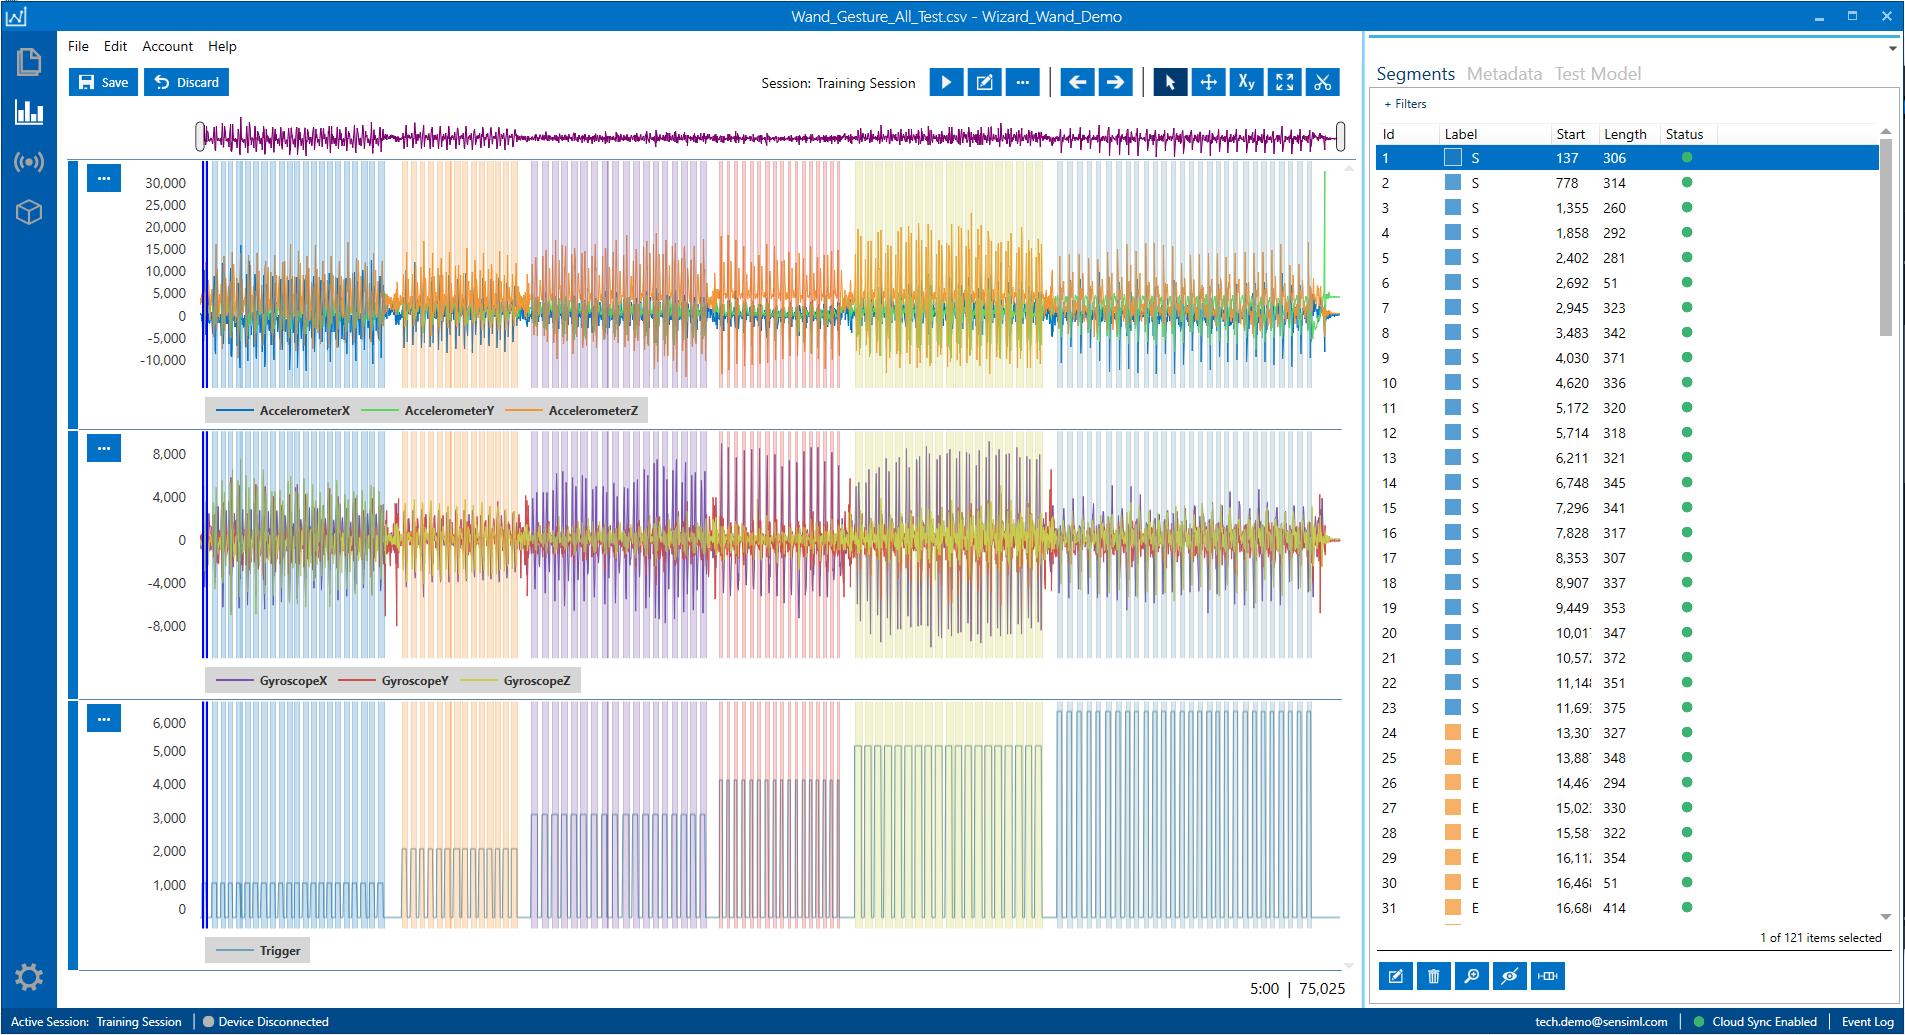
When the button is depressed the amplitude of the trigger channel is set to a value of 0x0100 * gesture_class_number, thus each gesture “S” is denoted by a square wave of amplitude 1024, each gesture “e” a square wave of ampltiude 2048, 3072 = “N”, 4096 = “I”, 5120 = “M”, 6144=”L”, and 7168 = “Unknown”. This scheme makes it really easy (trivial in fact) to autosegment and label each of the 1035 segments within Data Studio.
Tip
This same technique can be readily adapted to any application where the segment of interest can be captured via a switched or threshold signal input. With the full source code for the M5StickC PLUS reference firmware provided, the classes for the game gestures can be readily replaced with any other classmap and the trigger channel modified to suit other input triggers. This approach shows how ground truth labeling can be automated as part of the data acquisition itself.
Building the Knowledge Pack
We provide the pipeline settings JSON file that was used to generate the Knowledge Pack through the Analytics Studio below.
Download and unzip the pipeline settings JSON file.
Import the pipeline through the Analytics Studio Build Model tab.

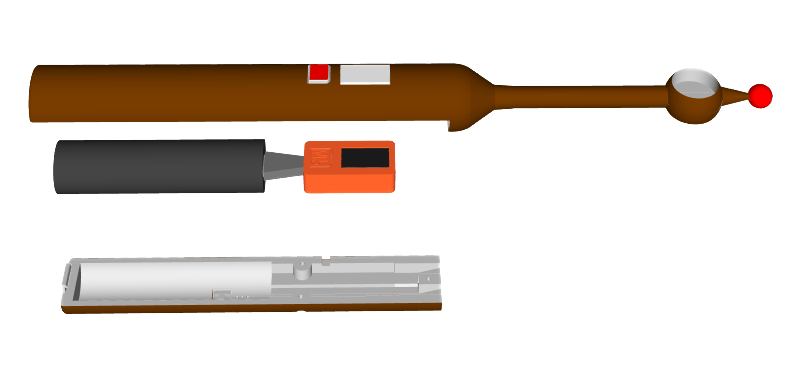
Building the Wizard Wand Device
While the game works fine using just the M5StickC PLUS itself, the completed game device encloses the M5StickC PLUS in a toy wand and includes LED lights and a USB battery charger to enhance the game experience. We provide the parts list and 3D print .STL files below for those interested in constructing the full game device.
Component |
Description |
Link / Download |
|---|---|---|
Wizard wand main body |
3D print file for main wand body |
|
Wizard wand back cover |
3D print file for wand back cover |
|
Portable USB Charger |
Cylindrical USB charger for extended wand battery life |
|
USB Adapter |
USB Adapter, Type-C Male to Type-A Male |
|
7-element ‘NeoPixel’ (WS2812B) LED Ring |
PCB with array of 7 3-wire addressable WS2812B RGB LEDs for wand tip |
|
Grove connector cable |
Single-ended Grove plug to bare wire ends |
|
Cover fastener Screw (Qty: 3) |
#2 x 1/2” 18-8 SS w/ plastic cutting threads |
|
(Optional) Primer Paint |
Tamiya Surface Primer |
|
(Optional) Finishing Paint |
Tamiya Color TS-69 (Linoeum Deck Brown) |
|
(Optional) Detail Paint (Red Button) |
Testor’s Enamel Model Paint |
Tip
The 3D printed part files were developed with a Selective Laser Sintering (SLS) process in mind and was tested to perform well on this process. PLA and other processes were not tested and thus results may vary.
Wand Device Assembly Steps
Print 3D parts, clean and de-flash as required.
If painting is desired, prime and paint as desired prior to assembly.
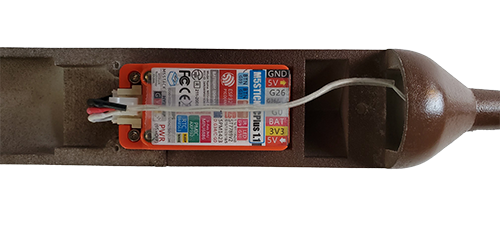
Thread Grove connector wiring for the LED array through the wand base tubing. Note: The wire leads may be too short to fully reach the LED array. If additional wiring must be spliced, we recommend to use smaller diameter 28AWG wire soldered close to the Grove connector. It is also recommended to use a small piece of tape to affix the wires to run down the center of the M5StickC PLUS as shown in the picture.
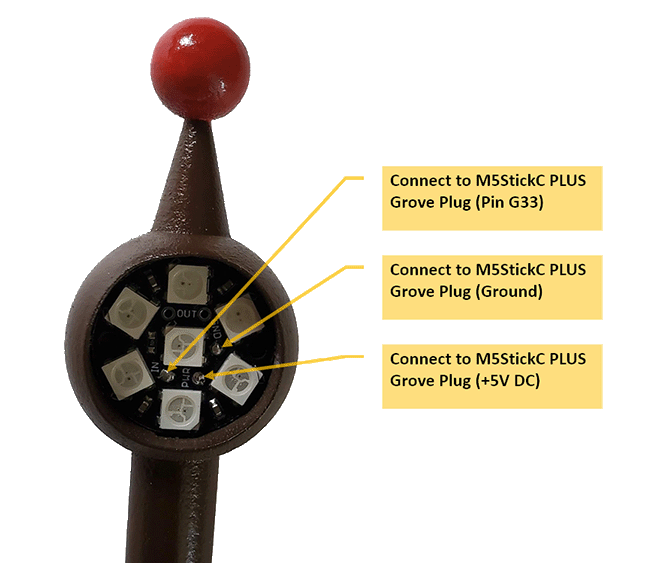
Solder the wire lead ends to the NeoPixel LED array PCB as shown in the picture below.
Press the LED array PCB into the head of the wand and affix with two small screws
Connect the Grove connector to the M5StickC PLUS device. Note: only three of the pins are connected (5V, Gnd, and G33). Pin G32 is unused.
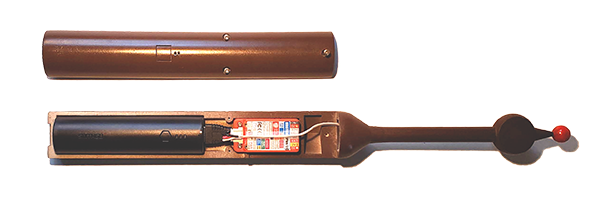
Assemble the USB portable battery charger to the M5StickC PLUS using the USB adapter and fit into the wand base.
Attach the wand base rear cover using three #2-1/2” screws.
The device is now complete and can be powered on using the square button on the back of the device (USB battery powered) or via the button on the side of the wand (does not power up the USB battery).